Webserver Setup
Overview
In order for the routing for a Phalcon application to work, you will need to set up your web server in a way that it will process redirects properly. Below are instructions for popular web servers:
PHP Built-in
The PHP built-in web server is not recommended for production applications. You can use it though very easily for development purposes. The syntax is:
If your application has its entry point in /public/index.php or your project has been created by the Phalcon Devtools, then you can start the web server with the following command:
The above command does:
| Command | Description |
|---|---|
$(which php) | will insert the absolute path to your PHP binary |
-S localhost:8000 | invokes server mode with the provided host:port |
-t public | defines the server root directory, necessary for php to route requests to assets like JS, CSS, and images in your public directory |
.htrouter.php | the entry point that will be evaluated for each request |
The .htrouter.php file must contain:
<?php

declare(strict_types=1);

$uri = urldecode(
    parse_url($_SERVER['REQUEST_URI'], PHP_URL_PATH)
);

if ($uri !== '/' && file_exists(__DIR__ . '/public' . $uri)) {
    return false;
}

$_GET['_url'] = $_SERVER['REQUEST_URI'];

require_once __DIR__ . '/public/index.php';
If your entry point is not public/index.php, then adjust the .htrouter.php file accordingly (last line) as well as the script call. You can also change the port if you like as well as the network interface that it binds to.
After executing the command above, navigating to http://localhost:8000/ will show your site.
PHP-FPM
The PHP-FPM (FastCGI Process Manager) is usually used to allow the processing of PHP files. Nowadays, PHP-FPM is bundled with all Linux-based PHP distributions.
On Windows PHP-FPM is in the PHP distribution archive. The file php-cgi.exe can be used to start the process and set options. Windows does not support unix sockets so this script will start fast-cgi in TCP mode on port 9000.
Create the file php-fcgi.bat with the following contents:
@ECHO OFF
ECHO Starting PHP FastCGI...
set PATH=C:\PHP;%PATH%
c:\bin\RunHiddenConsole.exe C:\PHP\php-cgi.exe -b 127.0.0.1:9000
nginx
nginx is a free, open-source, high-performance HTTP server and reverse proxy, as well as an IMAP/POP3 proxy server. Unlike traditional servers, nginx doesn't rely on threads to handle requests. Instead, it uses a much more scalable event-driven (asynchronous) architecture. This architecture uses small, but more importantly, predictable amounts of memory under load.
Phalcon with nginx and PHP-FPM provides a powerful set of tools that offer maximum performance for your PHP applications.
Install nginx
Phalcon Configuration
You can use the following potential configuration to set up nginx with Phalcon:
server {
    # Port 80 will require nginx to be started with root permissions
    # Depending on how you install nginx to use port 80 you will need
    # to start the server with `sudo` ports about 1000 do not require
    # root privileges
    # listen      80;

    listen        8000;
    server_name   default;

    ##########################
    # In production require SSL
    # listen 443 ssl default_server;

    # ssl on;
    # ssl_session_timeout  5m;
    # ssl_protocols  SSLv2 SSLv3 TLSv1;
    # ssl_ciphers  ALL:!ADH:!EXPORT56:RC4+RSA:+HIGH:+MEDIUM:+LOW:+SSLv2:+EXP;
    # ssl_prefer_server_ciphers   on;

    # These locations depend on where you store your certs
    # ssl_certificate        /var/nginx/certs/default.cert;
    # ssl_certificate_key    /var/nginx/certs/default.key;
    ##########################

    # This is the folder that index.php is in
    root /var/www/default/public;
    index index.php index.html index.htm;

    charset utf-8;
    client_max_body_size 100M;
    fastcgi_read_timeout 1800;

    # Represents the root of the domain
    # https://localhost:8000/[index.php]
    location / {
        # Matches URLS `$_GET['_url']`
        try_files $uri $uri/ /index.php?_url=$uri&$args;
    }

    # When the HTTP request does not match the above
    # and the file ends in .php
    location ~ [^/]\.php(/|$) {
        # try_files $uri =404;

        # Ubuntu and PHP7.0-fpm in socket mode
        # This path is dependent on the version of PHP install
        fastcgi_pass  unix:/var/run/php/php7.0-fpm.sock;


        # Alternatively you use PHP-FPM in TCP mode (Required on Windows)
        # You will need to configure FPM to listen on a standard port
        # https://www.nginx.com/resources/wiki/start/topics/examples/phpfastcgionwindows/
        # fastcgi_pass  127.0.0.1:9000;

        fastcgi_index /index.php;

        include fastcgi_params;
        fastcgi_split_path_info ^(.+?\.php)(/.*)$;
        if (!-f $document_root$fastcgi_script_name) {
            return 404;
        }

        fastcgi_param PATH_INFO       $fastcgi_path_info;
        # fastcgi_param PATH_TRANSLATED $document_root$fastcgi_path_info;
        # and set php.ini cgi.fix_pathinfo=0

        fastcgi_param SCRIPT_FILENAME $document_root$fastcgi_script_name;
    }

    location ~ /\.ht {
        deny all;
    }

    location ~* \.(js|css|png|jpg|jpeg|gif|ico)$ {
        expires       max;
        log_not_found off;
        access_log    off;
    }
}
Start
Depending on your system, the command to start nginx could be one of the following:
Apache
Apache is a popular and well-known web server available on many platforms.
Phalcon Configuration
The following are potential configurations you can use to set up Apache with Phalcon. These notes are primarily focused on the configuration of the mod_rewrite module allowing to use of friendly URLs and the router component. A common directory structure for an application is:
Document root The most common case is for an application to be installed in a directory under the document root. If that is the case, we can use .htaccess files. The first one will be used to hide the application code forwarding all requests to the application's document root (public/).
NOTE
Note that using .htaccess files requires your apache installation to have the AllowOverride All option set.
# tutorial/.htaccess

<IfModule mod_rewrite.c>
    RewriteEngine on
    RewriteRule   ^$ public/    [L]
    RewriteRule   ((?s).*) public/$1 [L]
</IfModule>
A second .htaccess file is located in the public/ directory, this re-writes all the URIs to the public/index.php file:
# tutorial/public/.htaccess

<IfModule mod_rewrite.c>
    RewriteEngine On
    RewriteCond   %{REQUEST_FILENAME} !-d
    RewriteCond   %{REQUEST_FILENAME} !-f
    RewriteRule   ^((?s).*)$ index.php?_url=/$1 [QSA,L]
</IfModule>
International Characters For users that are using the Persian letter 'م' (meem) in uri parameters, there is an issue with mod_rewrite. To allow the matching to work as it does with English characters, you will need to change your .htaccess file:
# tutorial/public/.htaccess

<IfModule mod_rewrite.c>
    RewriteEngine On
    RewriteCond   %{REQUEST_FILENAME} !-d
    RewriteCond   %{REQUEST_FILENAME} !-f
    RewriteRule   ^([0-9A-Za-z\x7f-\xff]*)$ index.php?params=$1 [L]
</IfModule>
If your uri contains characters other than English, you might need to resort to the above change to allow mod_rewrite to accurately match your route.
Apache Configuration
If you do not want to use .htaccess files, you can move the relevant directives to apache's main configuration file:
<IfModule mod_rewrite.c>

    <Directory "/var/www/test">
        RewriteEngine on
        RewriteRule  ^$ public/    [L]
        RewriteRule  ((?s).*) public/$1 [L]
    </Directory>

    <Directory "/var/www/tutorial/public">
        RewriteEngine On
        RewriteCond   %{REQUEST_FILENAME} !-d
        RewriteCond   %{REQUEST_FILENAME} !-f
        RewriteRule   ^((?s).*)$ index.php?_url=/$1 [QSA,L]
    </Directory>

</IfModule>
Virtual Hosts
The configuration below is for when you want to install your application in a virtual host:
<VirtualHost *:80>

    ServerAdmin    [email protected]
    DocumentRoot   "/var/vhosts/tutorial/public"
    DirectoryIndex index.php
    ServerName     example.host
    ServerAlias    www.example.host

    <Directory "/var/vhosts/tutorial/public">
        Options       All
        AllowOverride All
        Require       all granted
    </Directory>

</VirtualHost>
Lighttpd
lighttpd (pronounced "lighty") is an open-source web server optimized for speed-critical environments while remaining standards-compliant, secure, and flexible. It was originally written by Jan Kneschke as a proof-of-concept of the c10k problem – how to handle 10,000 connections in parallel on one server but has gained worldwide popularity. Its name is a portmanteau of "light" and "httpd".
Install lighttpd
You can use the following potential configuration to set up lighttpd with Phalcon:
server.modules = (
        "mod_indexfile",
        "mod_access",
        "mod_alias",
        "mod_redirect",
        "mod_rewrite",
)

server.document-root        = "/var/www/html/public"
server.upload-dirs          = ( "/var/cache/lighttpd/uploads" )
server.errorlog             = "/var/log/lighttpd/error.log"
server.pid-file             = "/var/run/lighttpd.pid"
server.username             = "www-data"
server.groupname            = "www-data"
server.port                 = 80

# strict parsing and normalization of URL for consistency and security
# https://redmine.lighttpd.net/projects/lighttpd/wiki/Server_http-parseoptsDetails
# (might need to explicitly set "url-path-2f-decode" = "disable"
#  if a specific application is encoding URLs inside url-path)
server.http-parseopts = (
  "header-strict"           => "enable",# default
  "host-strict"             => "enable",# default
  "host-normalize"          => "enable",# default
  "url-normalize-unreserved"=> "enable",# recommended highly
  "url-normalize-required"  => "enable",# recommended
  "url-ctrls-reject"        => "enable",# recommended
  "url-path-2f-decode"      => "enable",# recommended highly (unless breaks app)
  "url-path-dotseg-remove"  => "enable",# recommended highly (unless breaks app)
)

index-file.names            = ( "index.php", "index.html" )
url.access-deny             = ( "~", ".inc" )
static-file.exclude-extensions = ( ".php", ".pl", ".fcgi" )

compress.cache-dir          = "/var/cache/lighttpd/compress/"
compress.filetype           = ( "application/javascript", "text/css", "text/html", "text/plain" )

# default listening port for IPv6 falls back to the IPv4 port
include_shell "/usr/share/lighttpd/use-ipv6.pl " + server.port
include_shell "/usr/share/lighttpd/create-mime.conf.pl"
include "/etc/lighttpd/conf-enabled/*.conf"

#server.compat-module-load   = "disable"
server.modules += (
        "mod_compress",
        "mod_dirlisting",
        "mod_staticfile",
)

url.rewrite-once = ( "^(/(?!(favicon.ico$|css/|js/|img/)).*)" => "/index.php?_url=$1" )
# or
#url.rewrite-if-not-file = ( "/" => "/index.php?_rl=$1" )
WAMP
WampServer is a Windows web development environment. It allows you to create web applications with Apache2, PHP, and a MySQL database. Below are detailed instructions on how to install Phalcon on WampServer for Windows. Using the latest WampServer version is highly recommended.
NOTE
Paths in this guide should be relative, according to your installation WAMP
Download Phalcon
For Phalcon to work on Windows, you must install the correct version that matches your architecture and extension. Load up the phpinfo page provided by WAMP and check the Architecture and Extension Build values. Those will allow you to download the correct DLL. For a thread-safe, x64 using VS16 and PHP 8.1, you will need to download the following file:
If your system reports NTS (Non Thread Safe) then you should download that DLL.
WAMP has both 32 and 64-bit versions. From the download section, you can download the Phalcon DLL that suits your WAMP installation.
Extract the php_phalcon.dll from the archive and copy the file php_phalcon.dll to the PHP extensions folder. If WAMP is installed in the C:\wamp folder, the extension needs to be in C:\wamp\bin\php\php8.1.0\ext (assuming your WAMP installation installed PHP 8.1.0).
Edit the php.ini file, it is located at C:\wamp\bin\php\php8.1.0\php.ini. It can be edited with Notepad or a similar program. We recommend Notepad++ to avoid issues with line endings. Append at the end of the file:
and save it.
Also edit the php.ini file, which is located at C:\wamp\bin\apache\apache2.4.9\bin\php.ini. Append at the end of the file:
and save it.
NOTE
The path above might differ depending on the apache installation you have for your web server. Adjust it accordingly.
Restart the Apache Web Server. Do a single click on the WampServer icon in the system tray. Choose Restart All Services from the pop-up menu. Check out that the tray icon will become green again.
Open your browser to navigate to https://localhost. The WAMP welcome page will appear. Check the section extensions loaded to ensure that Phalcon was loaded.
NOTE
Congratulations! You are now phlying with Phalcon.
XAMPP
XAMPP is an easy-to-install Apache distribution containing MySQL, PHP, and Perl. Once you download XAMPP, all you have to do is extract it and start using it. Below are detailed instructions on how to install Phalcon on XAMPP for Windows. Using the latest XAMPP version is highly recommended.
NOTE
Paths in this guide should be relative, according to your installation WAMP
Download Phalcon
For Phalcon to work on Windows, you must install the correct version that matches your architecture and extension. Load up the phpinfo page provided by WAMP and check the Architecture and Extension Build values. Those will allow you to download the correct DLL. For a thread-safe, x64 using VS16 and PHP 8.1, you will need to download the following file:
If your system reports NTS (Non Thread Safe) then you should download that DLL.
XAMPP offers both 32 and 64-bit versions of Apache and PHP: Phalcon has dlls for both, just choose the right dll for the installed version.
Extract the php_phalcon.dll from the archive and copy the file php_phalcon.dll to the PHP extensions directory. If you have installed XAMPP in the C:\xampp folder, the extension needs to be in C:\xampp\php\ext
Edit the php.ini file, it is located at C:\wamp\bin\php\php8.1.0\php.ini. It can be edited with Notepad or a similar program. We recommend Notepad++ to avoid issues with line endings. Append at the end of the file:
and save it.
Restart the Apache Web Server from the XAMPP Control Center. This will load the new PHP configuration. Open your browser to navigate to https://localhost. The XAMPP welcome page will appear. Click on the link phpinfo().
phpinfo will output a significant amount of information on the screen about the current state of PHP. Scroll down to check if the Phalcon extension has been loaded correctly.
NOTE
Congratulations! You are now phlying with Phalcon.
Cherokee
Cherokee is a high-performance web server. It is very fast, flexible, and easy to configure.
Phalcon Configuration
Cherokee provides a friendly graphical interface to configure almost every setting available in the web server.
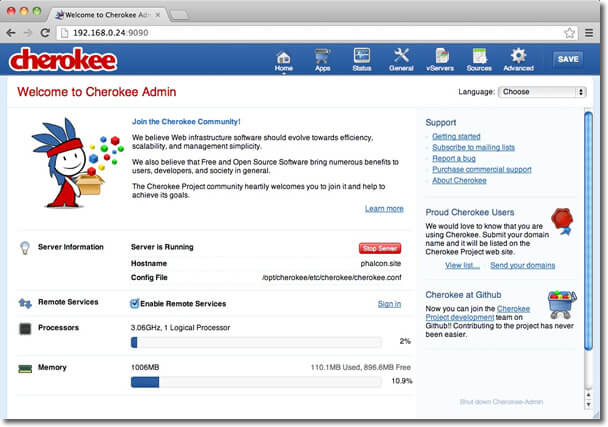
Start the cherokee administrator by executing as root /path-to-cherokee/sbin/cherokee-admin
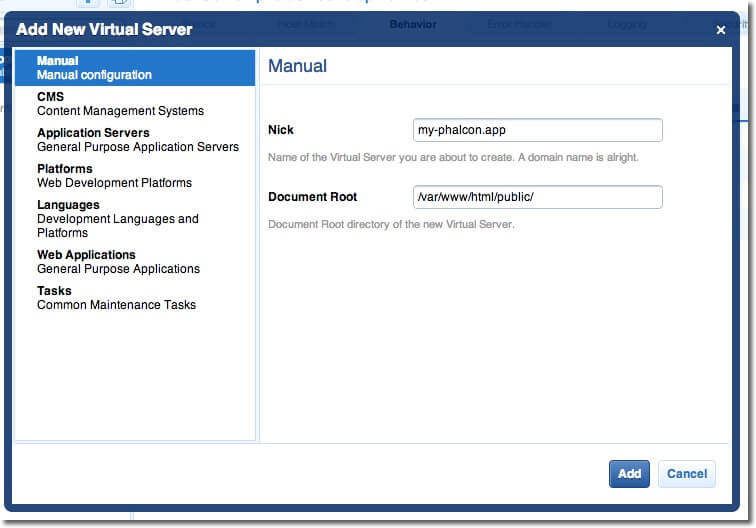
Create a new virtual host by clicking on vServers, then add a new virtual server:
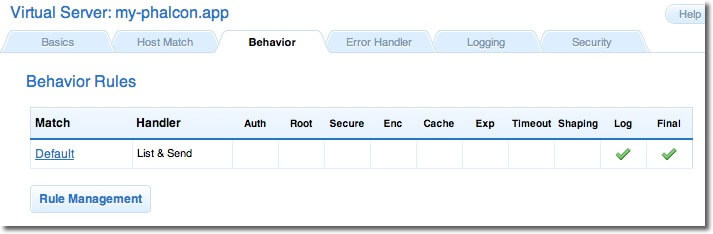
The recently added virtual server must appear at the left bar of the screen. In the Behaviors tab you will see a set of default behaviors for this virtual server. Click the Rule Management button. Remove those labeled as Directory /cherokee_themes and Directory /icons:
Add the PHP Language behavior using the wizard. This behavior allows you to run PHP applications:
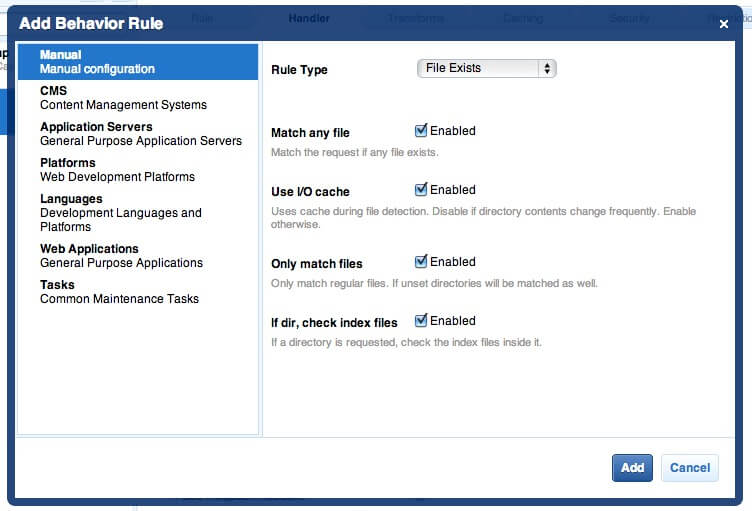
Normally this behavior does not require additional settings. Add another behavior, this time in the Manual Configuration section. In Rule Type choose File Exists, then make sure the option Match any file is enabled:
In the Handler tab choose List & Send as handler:

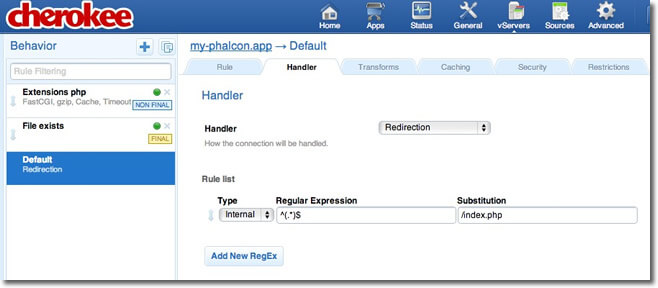
Edit the Default behavior in order to enable the URL-rewrite engine. Change the handler to Redirection, then add the following regular expression to the engine ^(.*)$:
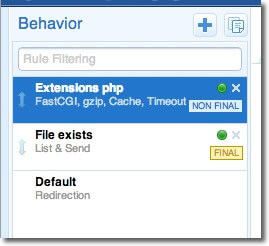
Finally, make sure the behaviors have the following order:
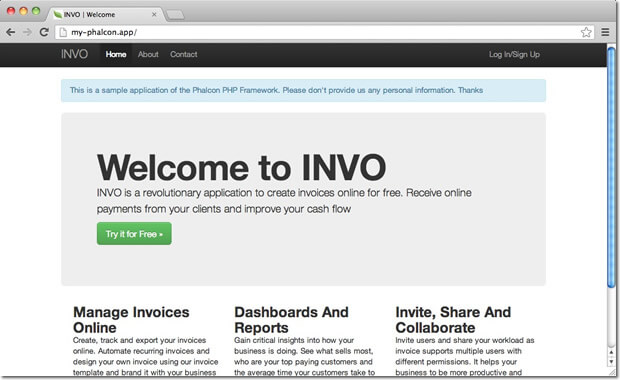
Execute the application in a browser:
Caddy
Caddy is the ultimate server that makes your sites more secure, more reliable, and more scalable than any other solution.
Phalcon Configuration
Cherokee provides a friendly graphical interface to configure almost every setting available on the web server.
You will need to make sure that PHP is available for your server using the php_fastcgi directive from Caddy.
For your site setup, you can use the following: